
Craig Pindell, Fine Art Photographer
All work copyright Craig Pindell, 2026
My Darkroom
When people find out I am a photographer, and that I shoot film, the first question they ask is usually "can you still buy film?" The second question is usually "Do you have your own black room?" I know they mean dark room, but it still makes me chuckle.
Something about darkrooms seems to be mysterious or magical to most people. I shouldn't be surprised, because working in the darkroom is still magical to me. I made my first darkroom print in 1978, in a friend's apartment in Scottsbluff Nebraska. He an I had photographed a total eclipse in Roundup Montana, and as usual, the local drugstore processed the film. When I look at those old negatives now, I realize how poorly developed they are, but back then I blamed all of the short comings on my lack of skill.
My friend did not have a darkroom in his apartment. We used a walk in closet to set up an enlarger that someone in his family had given him. We put the trays on the floor, and used the very out of date paper that came with the gift enlarger. Neither of us knew what we were doing, but we had read an article in a photography magazine, and it didn't sound so hard! I wish I had saved that article, because it gave us everything we needed to make prints. They certainly were not very good prints, but seeing the images appear on the paper in the developer was life changing, literally.
My very first darkroom print. The old paper was fogged around the edge, but there was an image!
My friend and I spent our entire day off work making two prints, one from my negative and one from his negative. The next day off I had, I drove to the nearest photography store (85 miles away) and bought an enlarger, negative carrier, enlarging lens, trays, paper, chemicals, and tongs. I was fortunate that the gentleman who worked at the photography store was knowledgeable about darkrooms, and steered me in the right direction. He also had a couple of books about darkroom work, and suggested I buy them, but I passed (and then went back in two weeks and bought both books).
Back then, I was single and lived in a two bedroom trailer house, so it made sense to me that the guest bedroom should become a darkroom. I disassembled the guest bed and stood the parts against the wall. I used the two night stands to support a piece of plywood I had found that was big enough to hold the enlarger and three 8x10 trays. I mixed chemistry in the kitchen sink, and washed prints in the bathroom. I had forgotten to buy a timer for the enlarger, so I would count seconds (one Ansel Adams, 2 Ansel Adams, 3 Ansel Adams........) for exposure. It wasn't accurate, but I was able to make prints.
I printed as much as I could after that, especially during the Wyoming winters, from when I got off work until late night, every night. I went through a lot of paper and chemistry, and eventually saw some improvement in my results. Eventually, I ventured into printing color negatives, and even made some Cibachrome prints. I depended on the advice from my friend at the camera store and my own adventurous experimentation. It was a slow and expensive way to learn, but I had a great time doing it, and the makeshift darkroom was perfect.
I eventually sold the trailer and moved into an apartment. The only space in the apartment for a darkroom was under a stairway, a small room, only about 5 foot by 6 foot. I built a shelf for the enlarger and trays, and was back in business. I still mixed the chemistry in the kitchen, and washed prints in the shower. I would load film into the developing tanks in the darkroom, then develop the film in the kitchen. It wasn't perfect, but it was working for me. My darkroom skills continued to improve and I was more proud of the prints I was making. When I opened my first portrait studio, and when I worked for a small weekly newspaper, this was the darkroom I used.
A few years later, I moved from that town, and for a while I did not have a darkroom. I missed it the darkroom work a lot. It was hard to find darkrooms to borrow, and getting film developed by others was less than optimum. At one point I stayed with my parents for a while, and I set up a temporary darkroom in their basement, under the stairs, in a space even smaller than my apartment darkroom. One of the prints I made in this darkroom, was chosen to be in the permanent collection of the Nicholayson Museum in Casper Wyoming. A darkroom does not have to be palatial for quality printmaking!
When I got married, my wife Katie and I moved into a small apartment, and the only place for a darkroom was in the closet of the guest bedroom. In order to use this darkroom, I had to remove the clothes that were hanging there, and move a kitchen chair into the closet to hold the trays. the chair was only large enough for two trays, so I only used developer and fixer - no stop bath. This caused the fixer to exhaust very quickly, but I did not have any other option.
Mixing chemistry in the kitchen sink was not acceptable to the new Mrs. After vigorous negotiations we came to an understanding. I had to mix chemistry in the bathtub and film processing was done in the bathroom as well. I washed the prints in the bathtub, and the agreement was that I had to wash out the bathtub after every darkroom session. This less than ideal situation was what I used when I started working for Associated Press as a photo-stringer. I would sell 2 to 8 prints per week to AP, all made in this "darkroom". It was functional, but not comfortable.
Katie and I eventually purchased our first house, and one of the requirements for the new house was a space for a darkroom with running water. The home we found was small but very nice, and had an apartment in the basement. This apartment had a kitchen, living room, bedroom, and bathroom. The kitchen became the darkroom, and the living room became the studio. I was spoiled with the counter space and the room in my new darkroom. I was in heaven. I had the space to print up to 16x20 prints! It was a great darkroom to work in.
A few years later, we moved to a larger and more convenient house. This house did not come with a darkroom, like our last house, but it did have an unfinished basement, which allowed me to create a darkroom layout from scratch. During the 25+ years we have lived in this house, I have changed the darkroom layout 3 times. I want to explain the current layout, and explain why I chose to lay things out this way.
Overall Layout
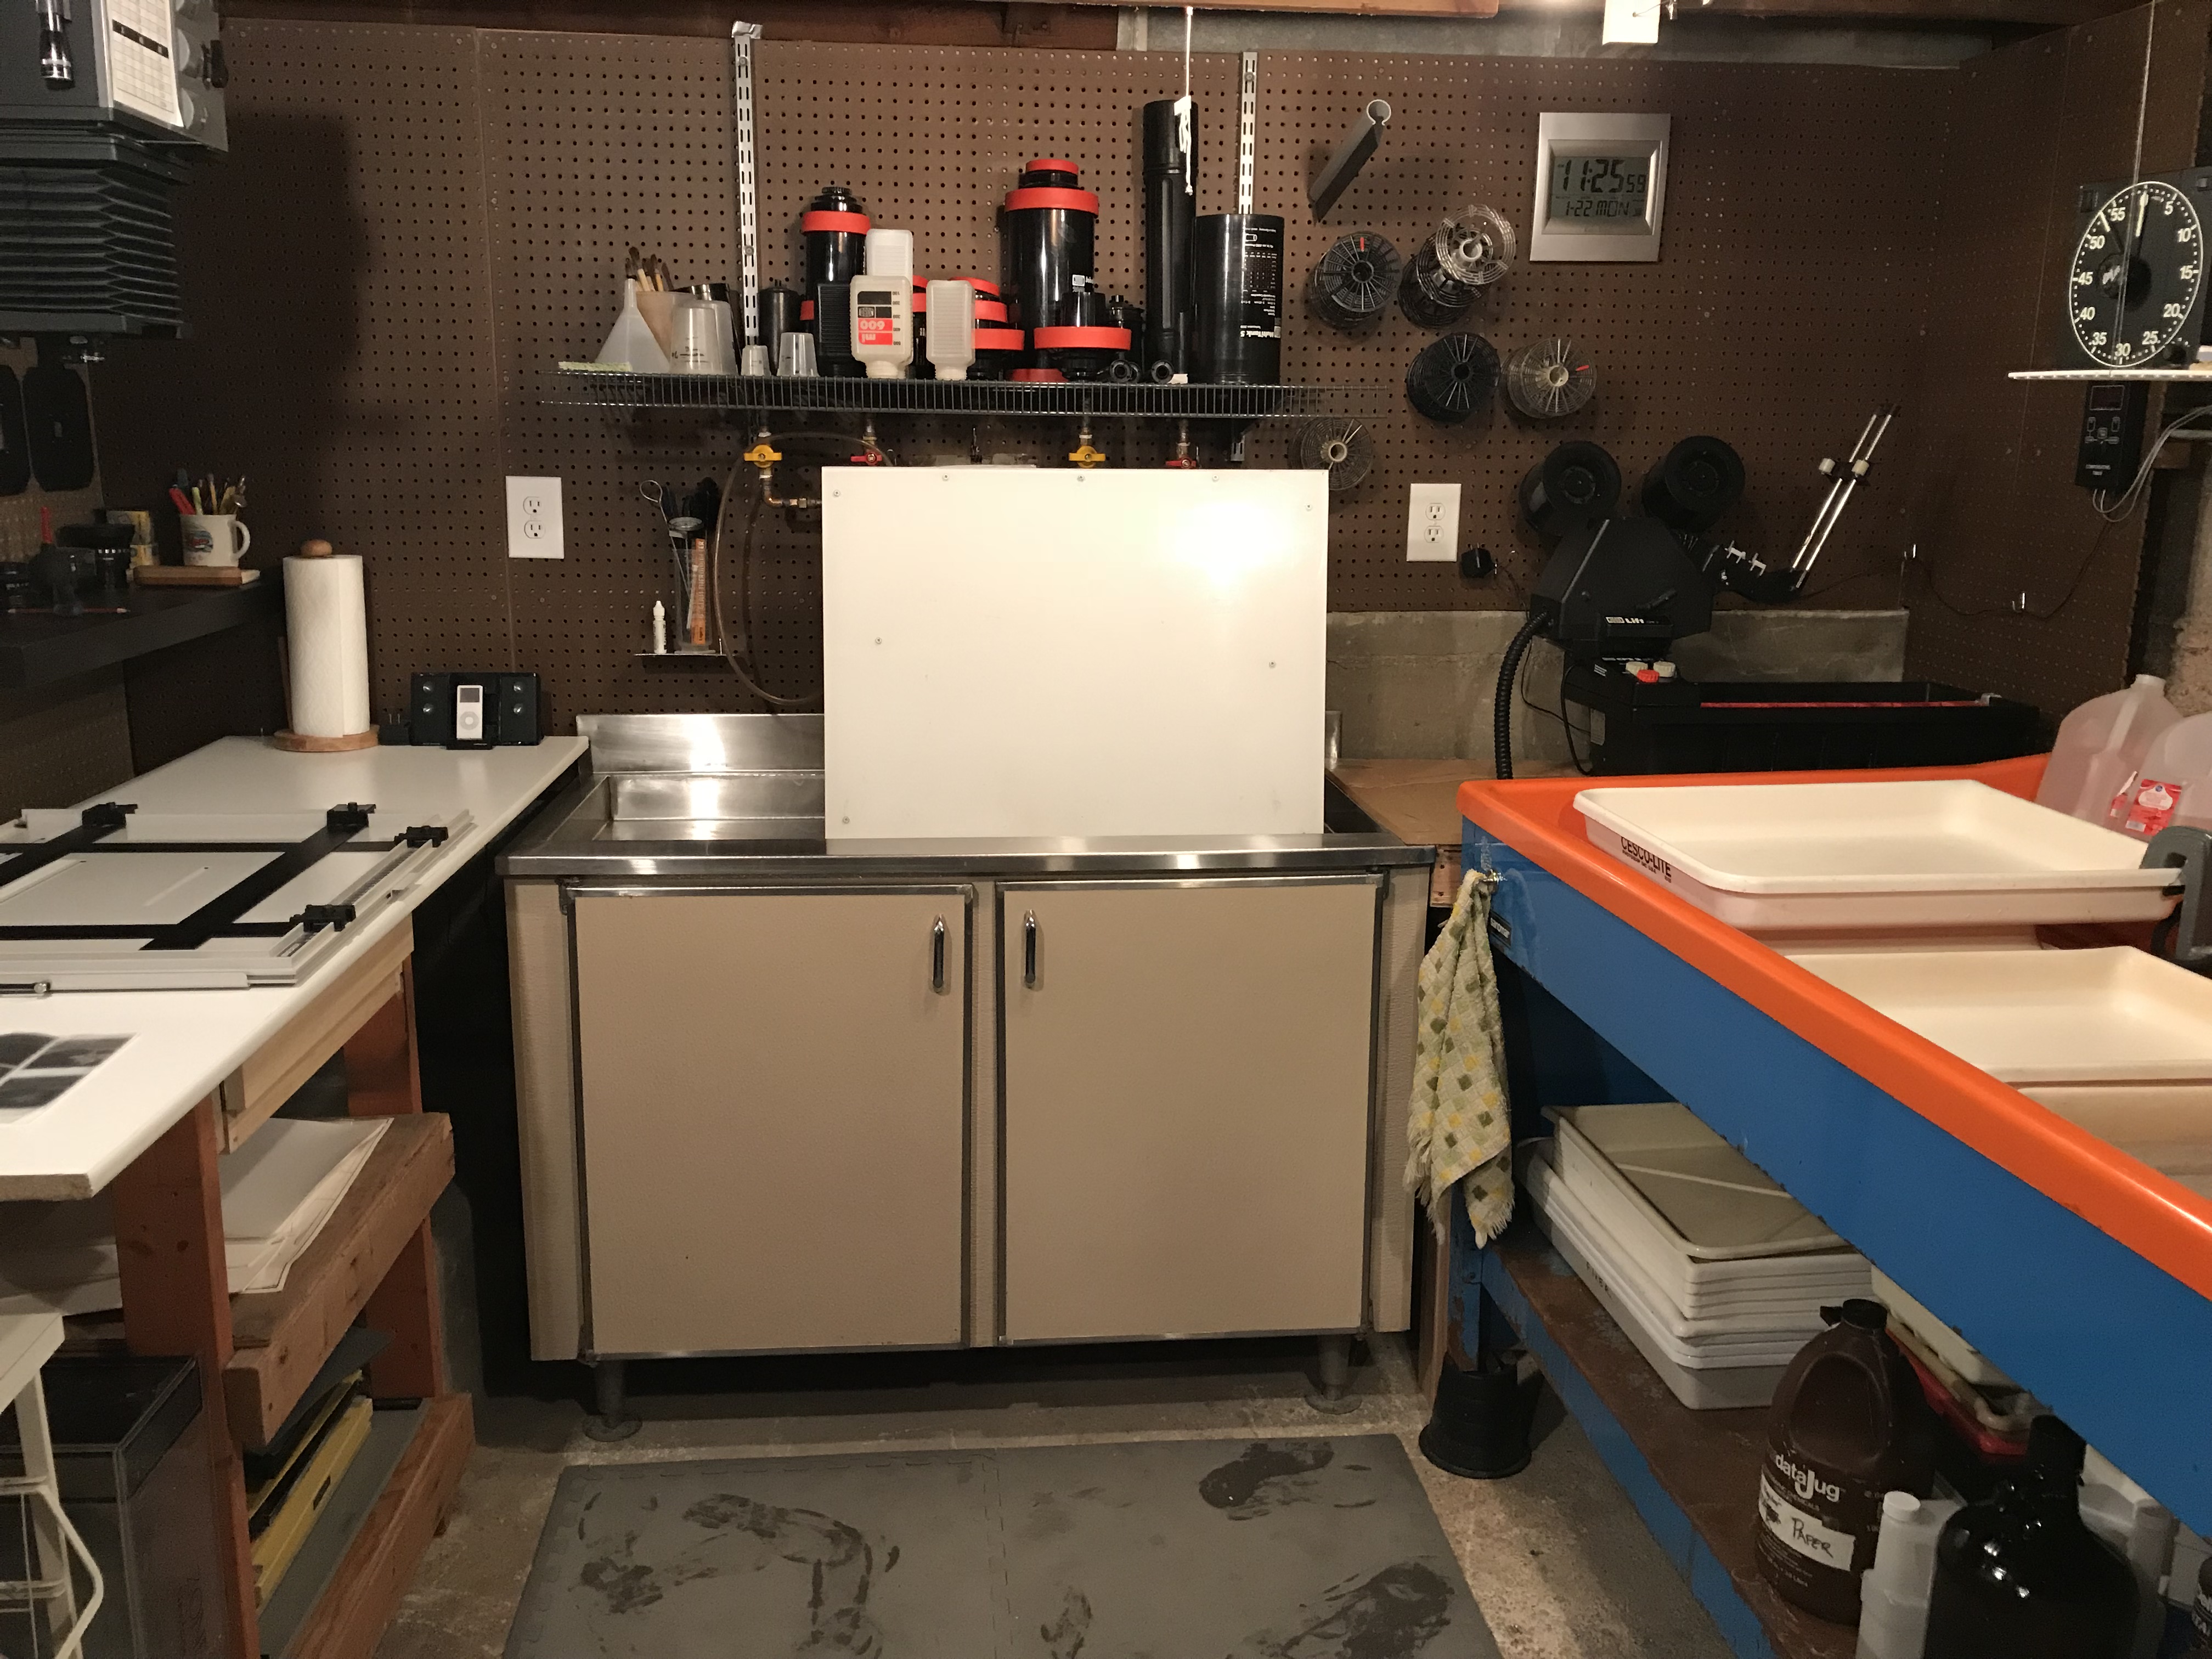
I have the enlargers on one side of the darkroom, and the large sink (for print trays) on the other side of the darkroom. The smaller sink (used for film processing) is across the end of the darkroom opposite the entry door. This horseshoe shape is the most effective for me. I installed peg board on as much of the wall space as possible. This allows me to hang reels and tanks, negative carriers, printing tools, notes, etc. all around the darkroom - where ever these things are the handiest.
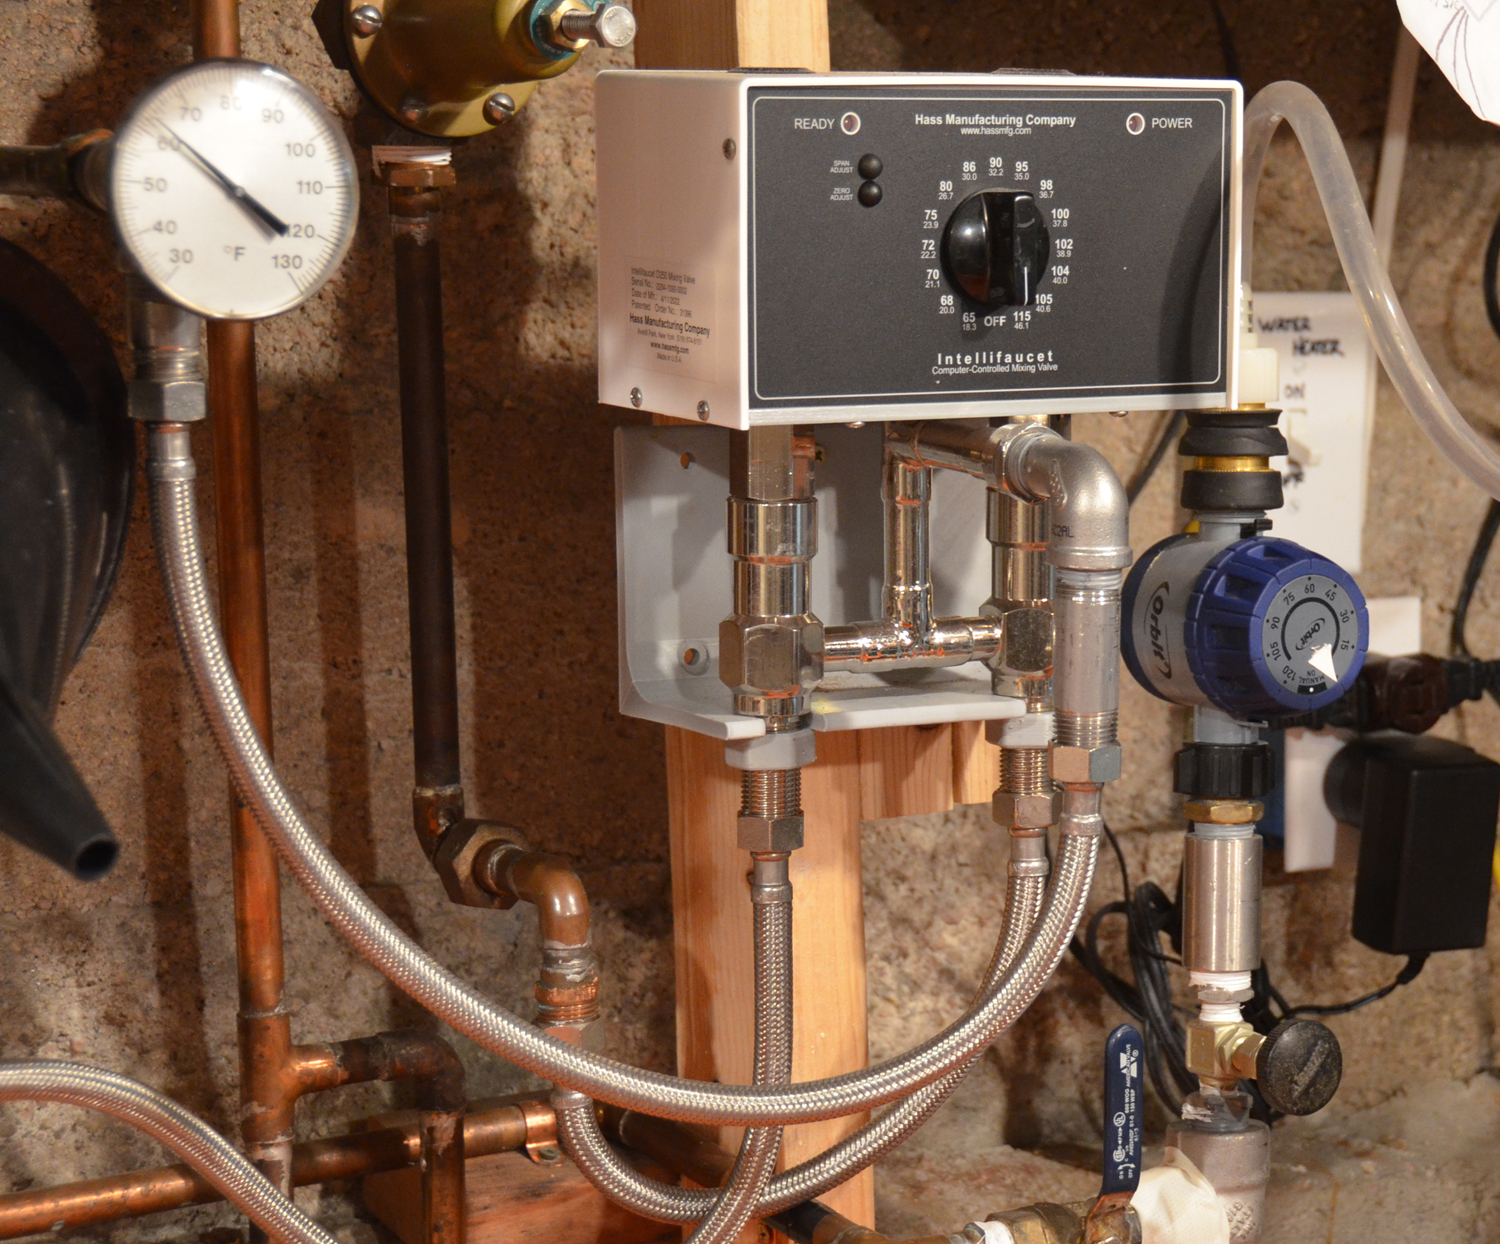
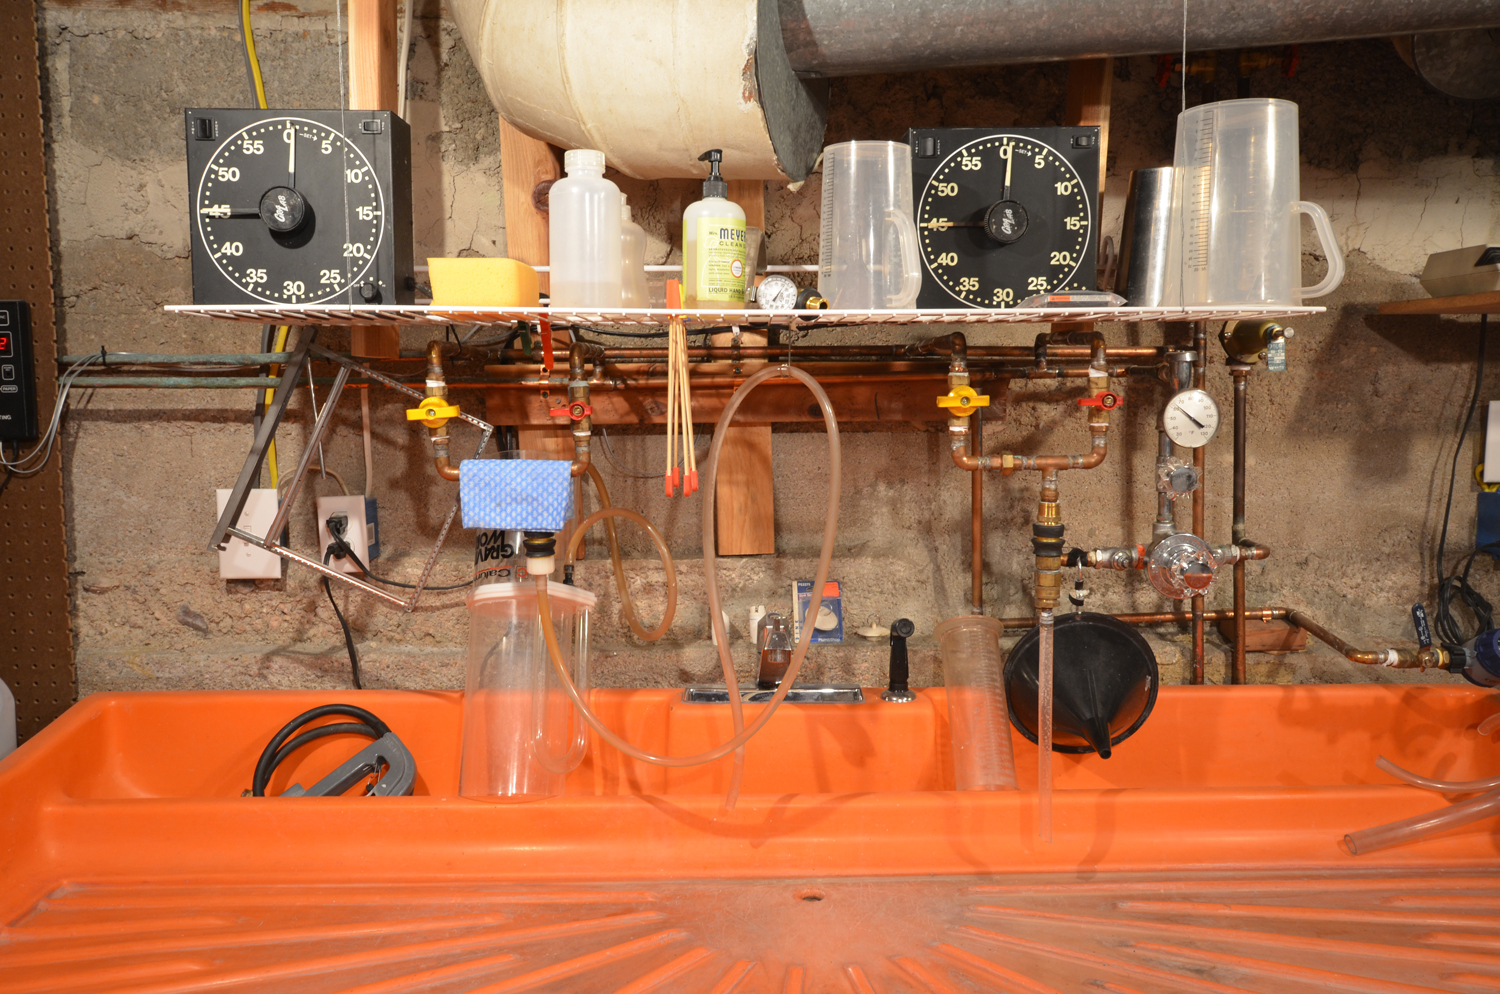
Each of the locations with hoses have two valves. The right side, with the red handle is temperature controlled water from the temperature control faucet. On the left side of each location is a hot water valve. Where I live the water supplied by our city can get as low as 46 degrees F in the winter. In the summer, because our water system is fed from the mountains west of town, the water seldom gets above 65 degrees F. I know some photographers who have a chilled water system for their darkrooms to be able to control water temperature, but here, I only need to heat water.
I installed a small electric water heater in the darkroom. This prevents any temperature shift should the Mrs. be washing clothes, doing dishes or taking a shower. Processing color requires very consistent temperatures, and with this water heater and the temperature control faucet, I seldom have any water temperature fluctuation.
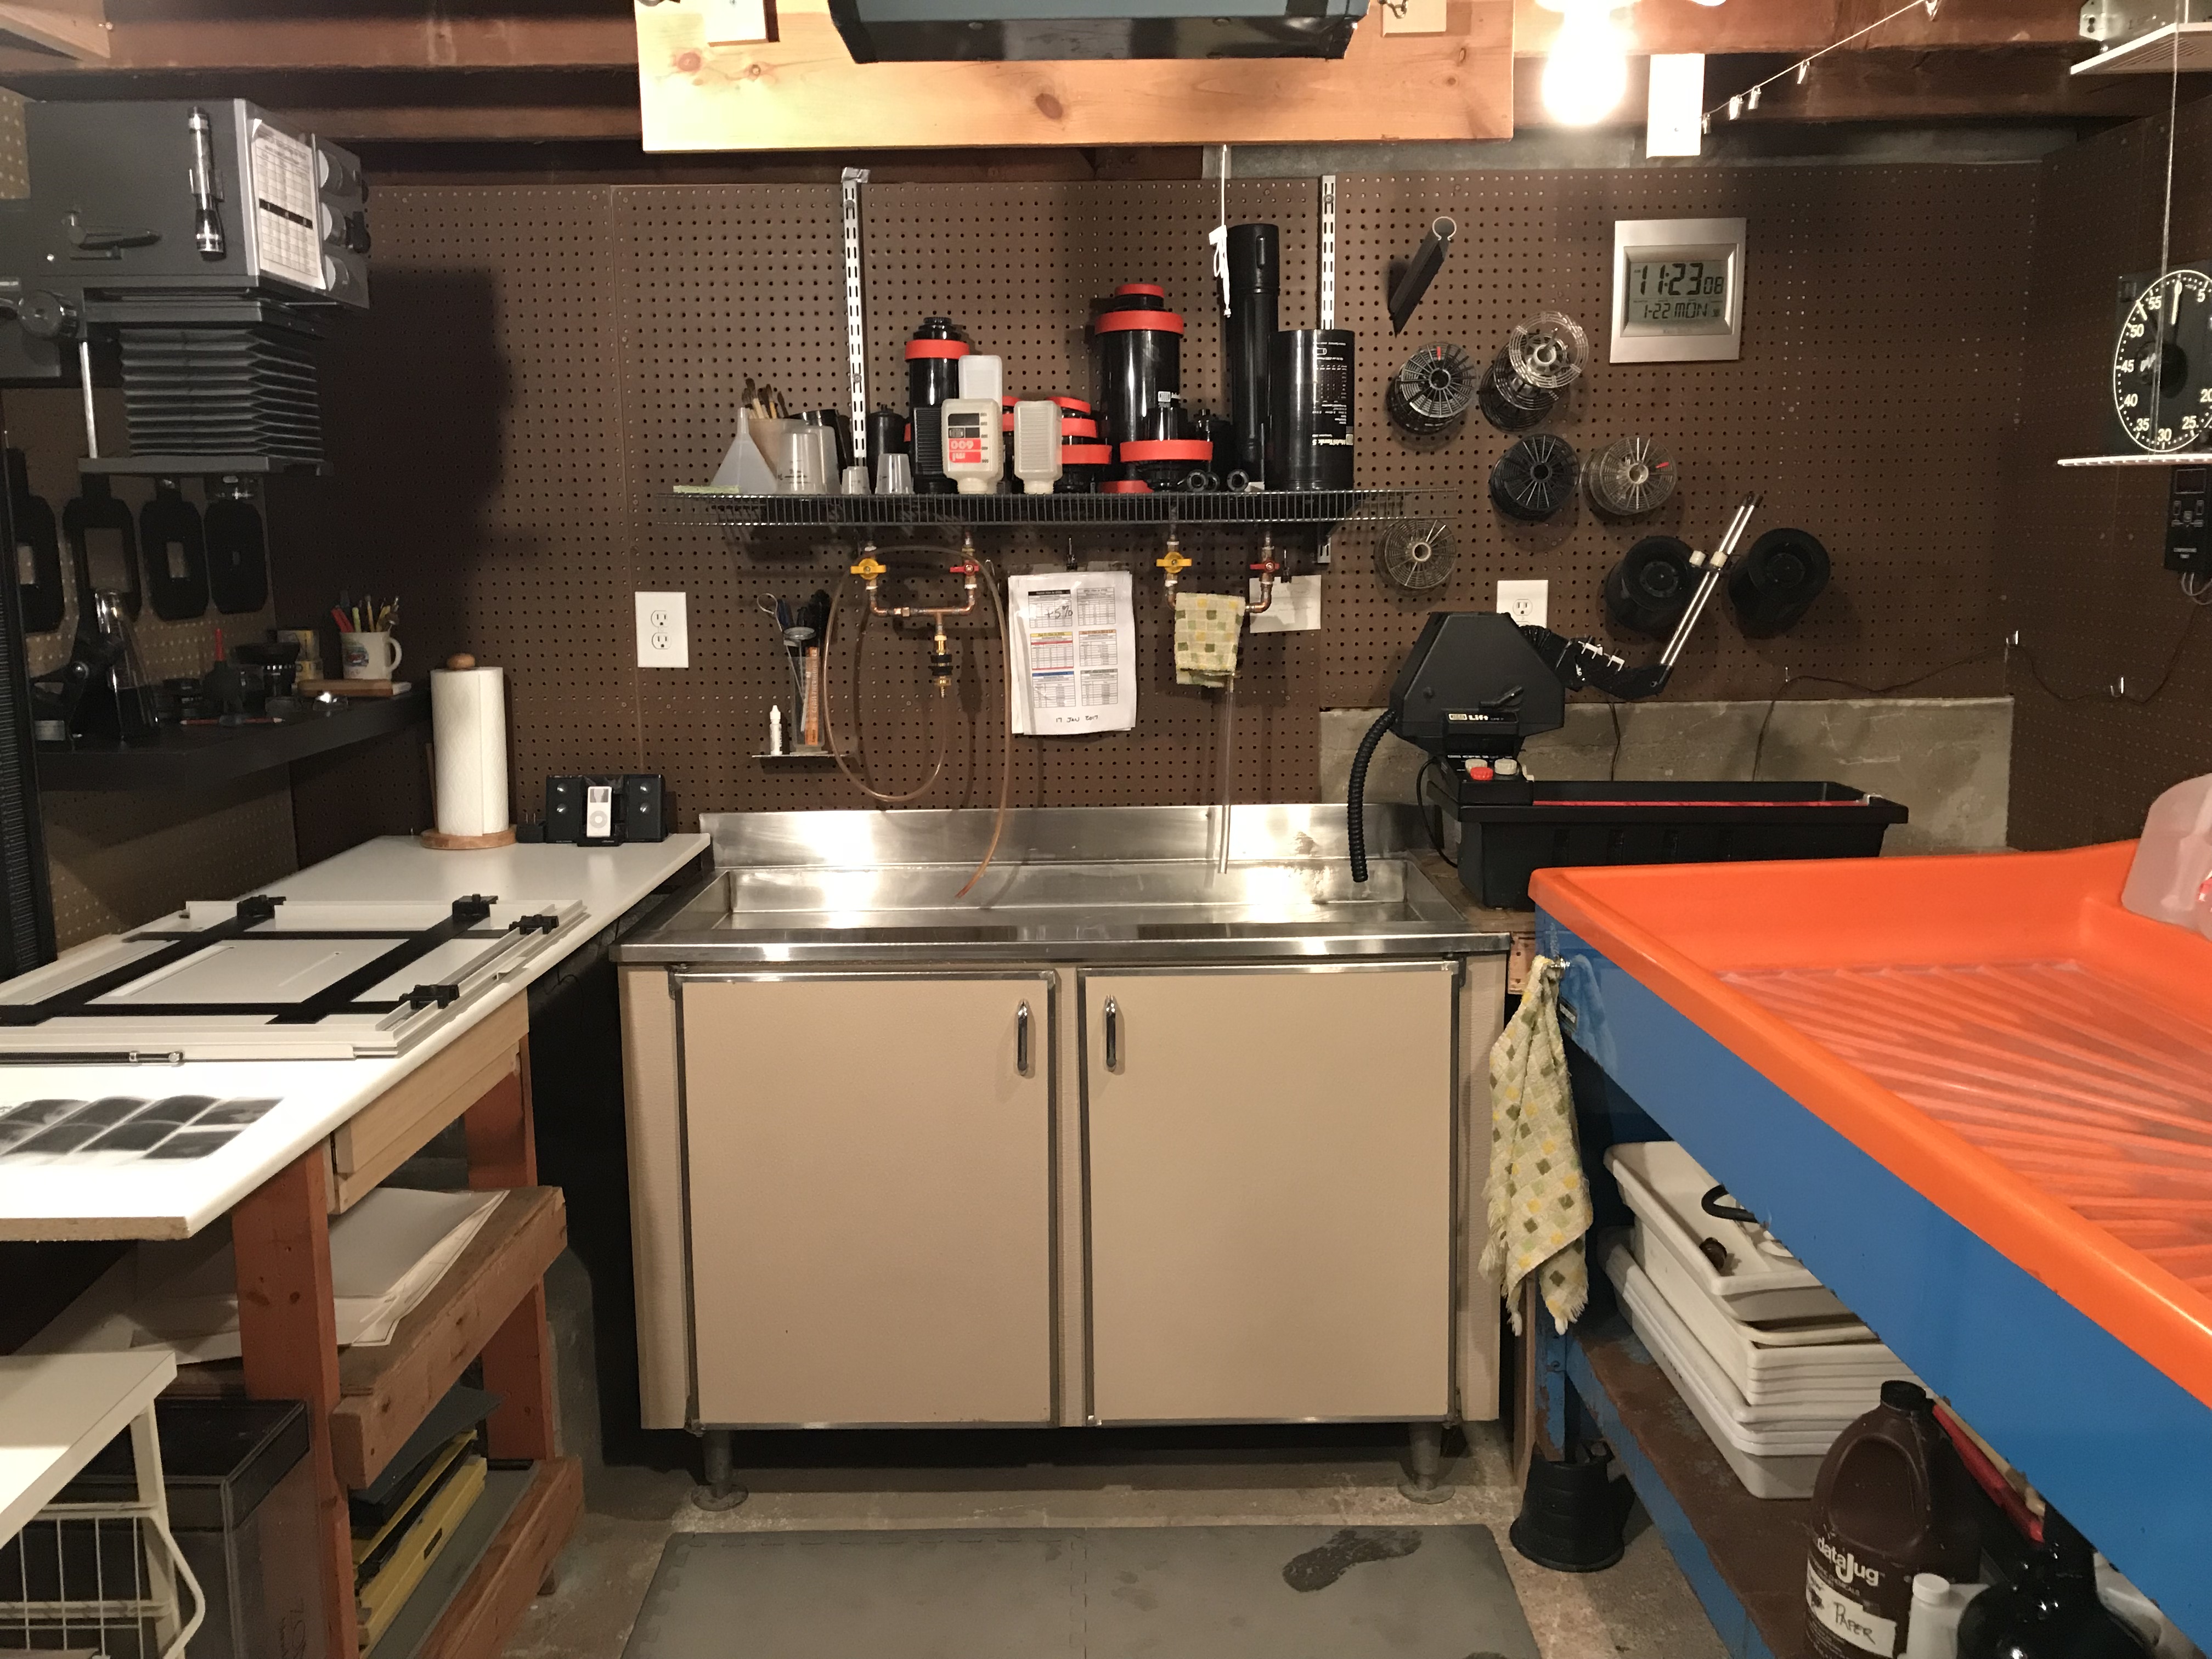
4x5 enlarger, small sink, Jobo processor, and large sink
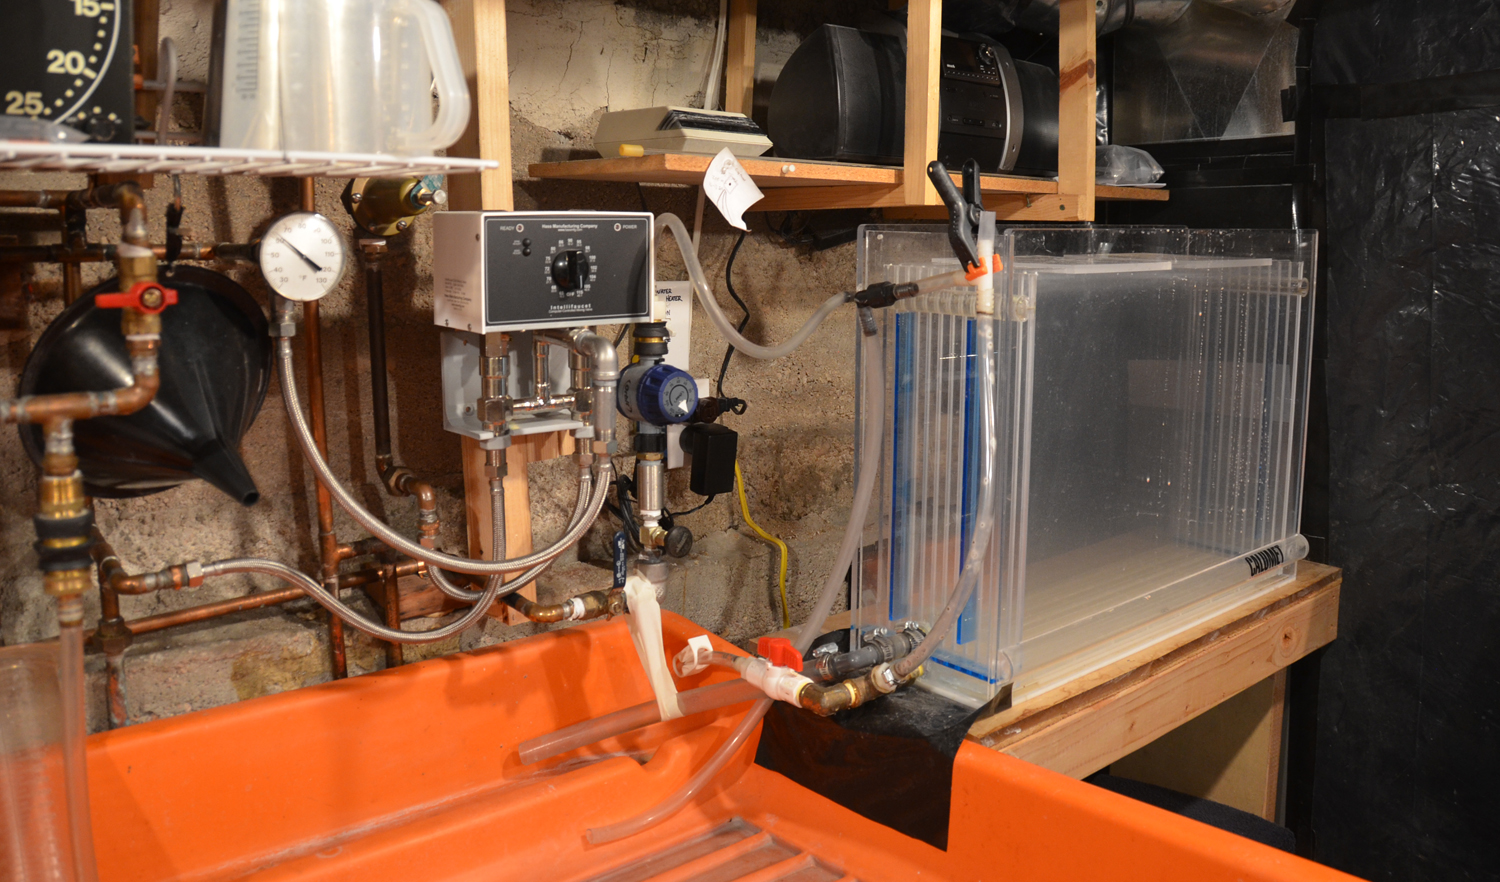
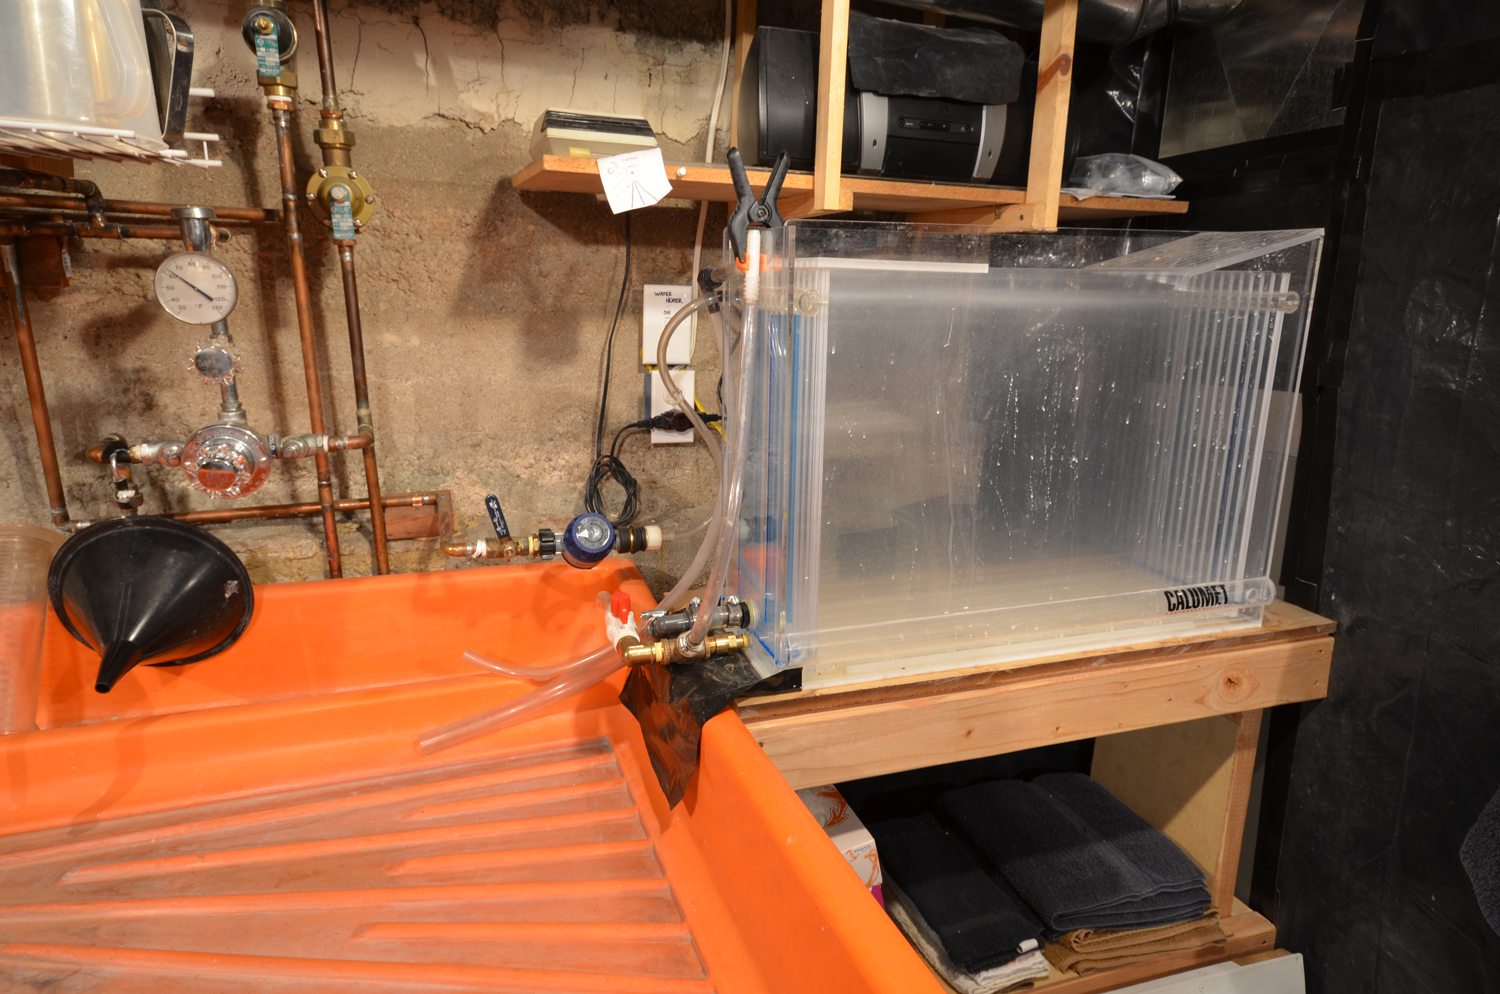
Large sink, Intellifaucet temperature control faucet, wash timer, and Calumet archival print washer.
The 16×20 archival washer is on the right of the image above. This washer is used for sheet film and prints. All my
roll film is washed in a Calumet archival washer, sized for the Jobo
rolls. This print washer has been an awesome addition to the darkroom. I
made some plumbing modifications so that it does not drain when washing
is completed.
I also adapted a timer from the garden store so that I can put prints in
the washer and walk away, knowing that when the wash time is complete,
the prints will be waiting for me to come back when I can to squeegee
them and put them on the drying rack.
This saves a lot of water and frees me up for other things.
Making prints
I have two enlargers. My 8×10 enlarger is a Durst Dichroic, which I use
for 8×10, 5×7, and 6×17 printing. The timer for the Durst is a
Lektra Model TM762 that came with the enlarger. My 4×5 enlarger (below) is a Saunders
LPL with a Dichroic color module. The timer for the Saunders is a Jobo
digital.
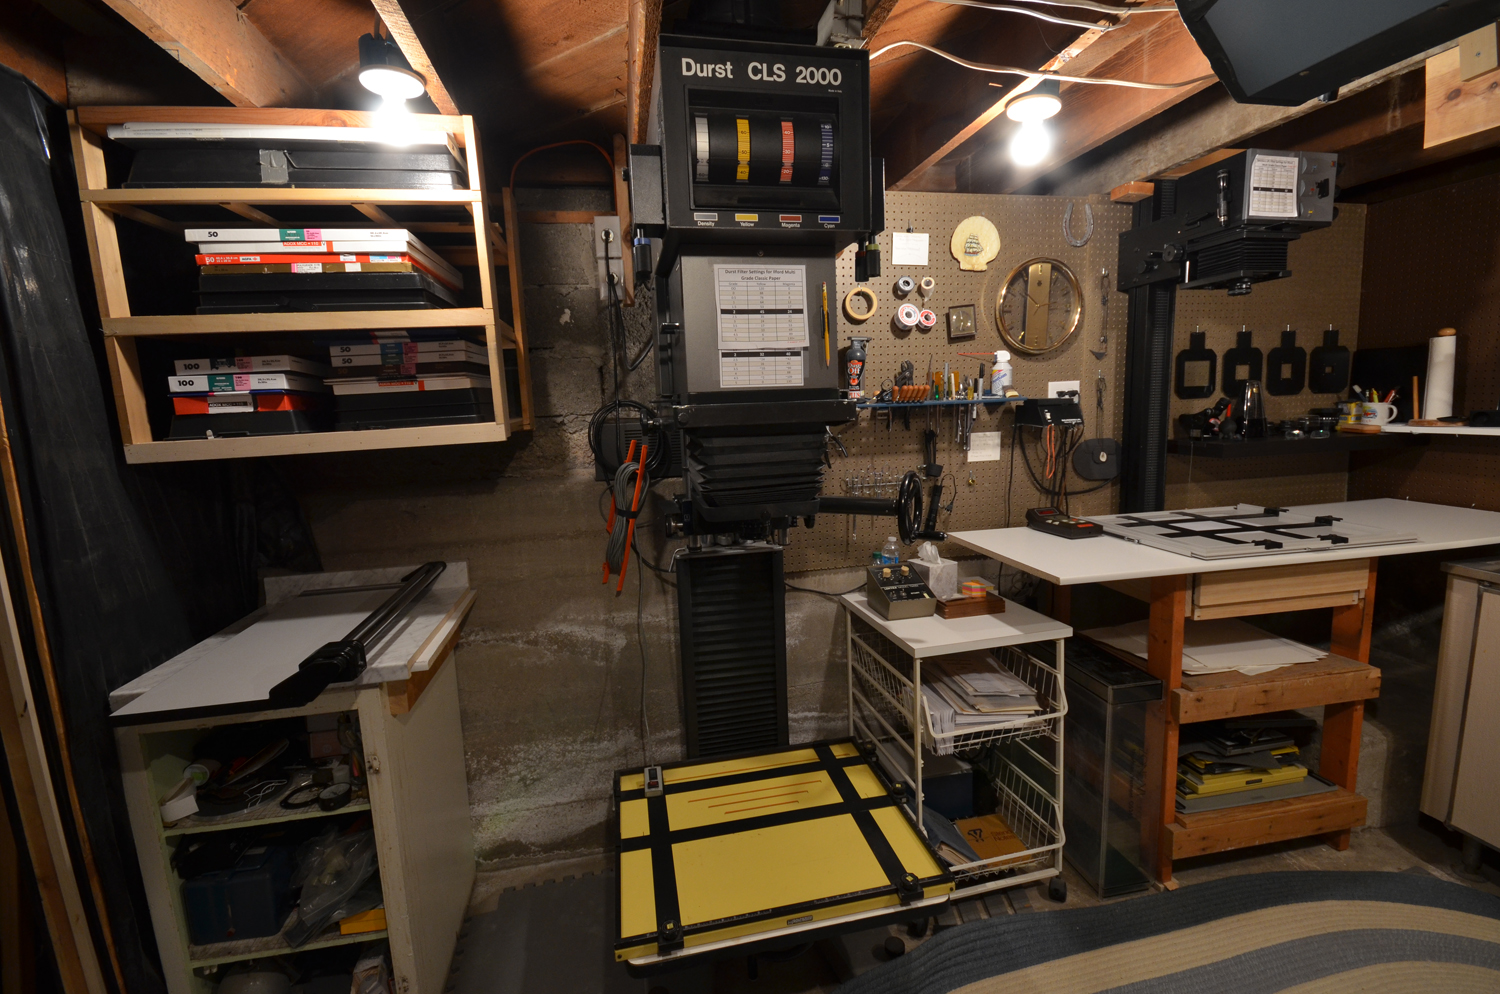
8x10 Durst Dichroic Enlarger
4x5 Saunders LPL Enlarger with negative carriers and lenses
The drawer below the enlarger is a light-safe drawer based on a drawing
from John Sexton. This has to be one of the most efficiency improving
additions to my darkroom. It was not expensive to build and I finished
it in an afternoon.
Having the negative carriers, lenses, dodging tools and grain focuser
close to the work area is a huge improvement for me as well.
I can’t talk about printing without talking about paper, specifically
how it’s stored. The image below is my paper storage area. Having the
paper sorted by size and properly stored helps me to know when I am
running short on a particular size of a particular paper.
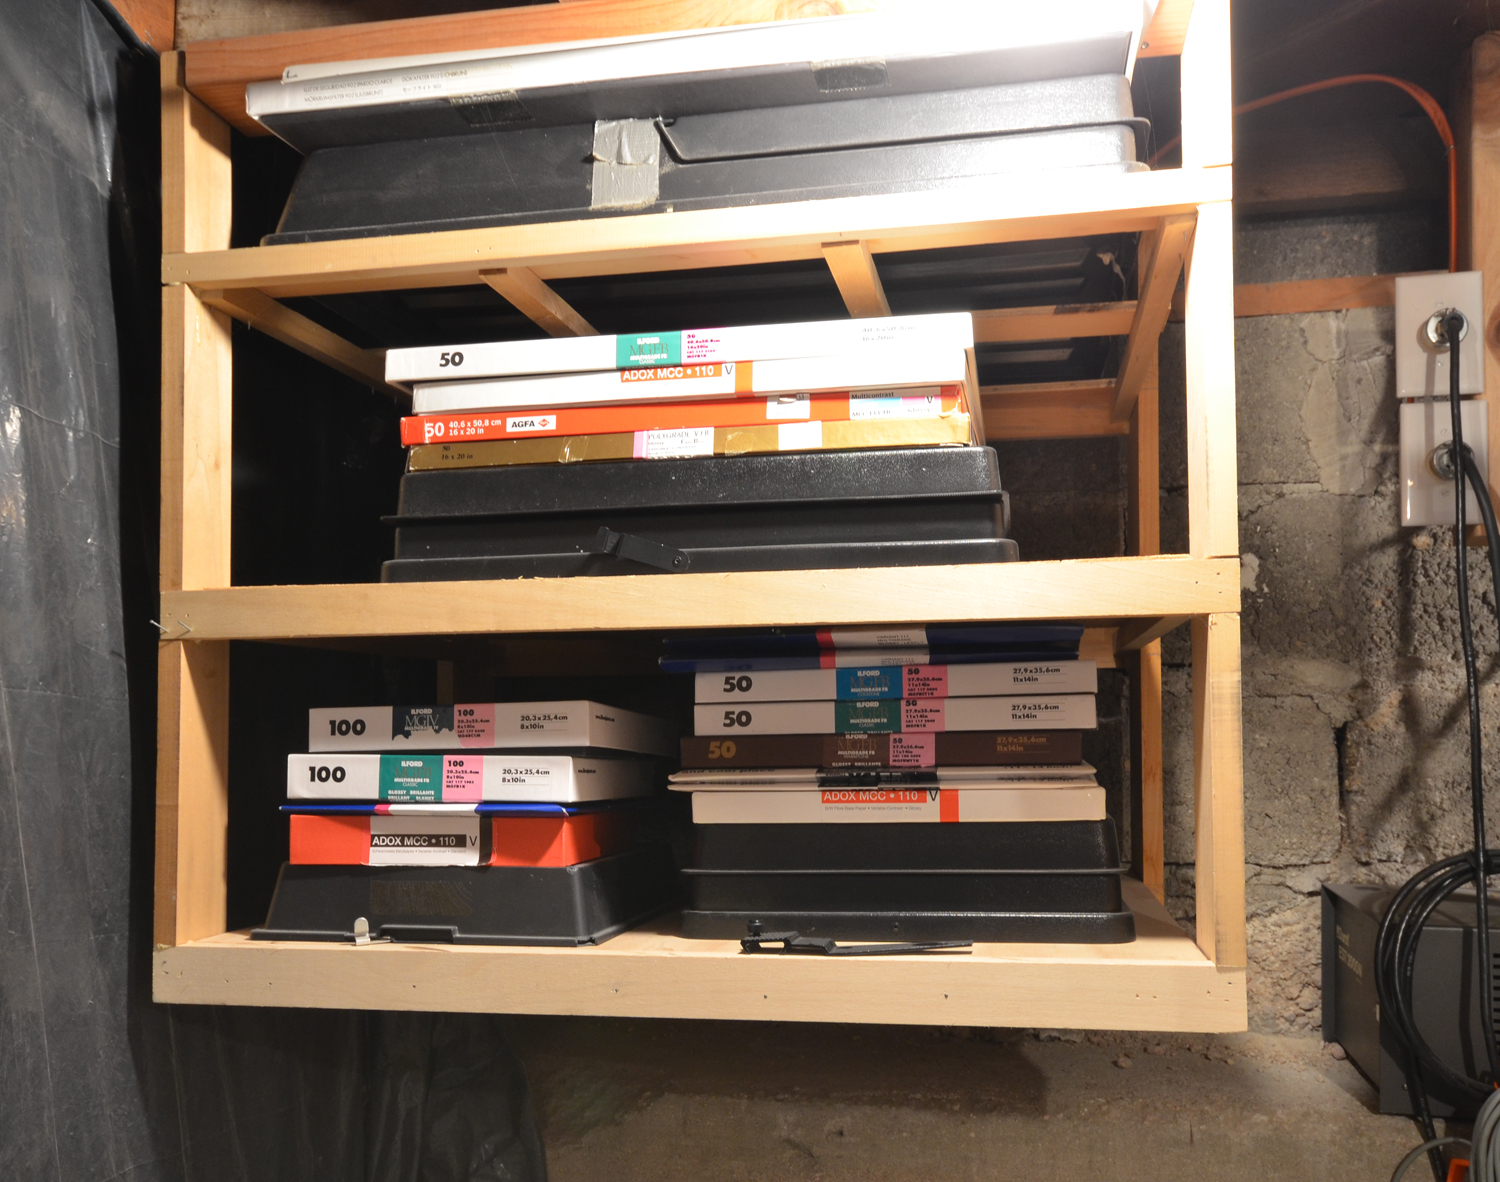
I find this set-up really helps if I am not able to print for extended
times and want to catch up with a marathon
printing session. Living so far from a source for paper, the lead time
can be quite an issue.
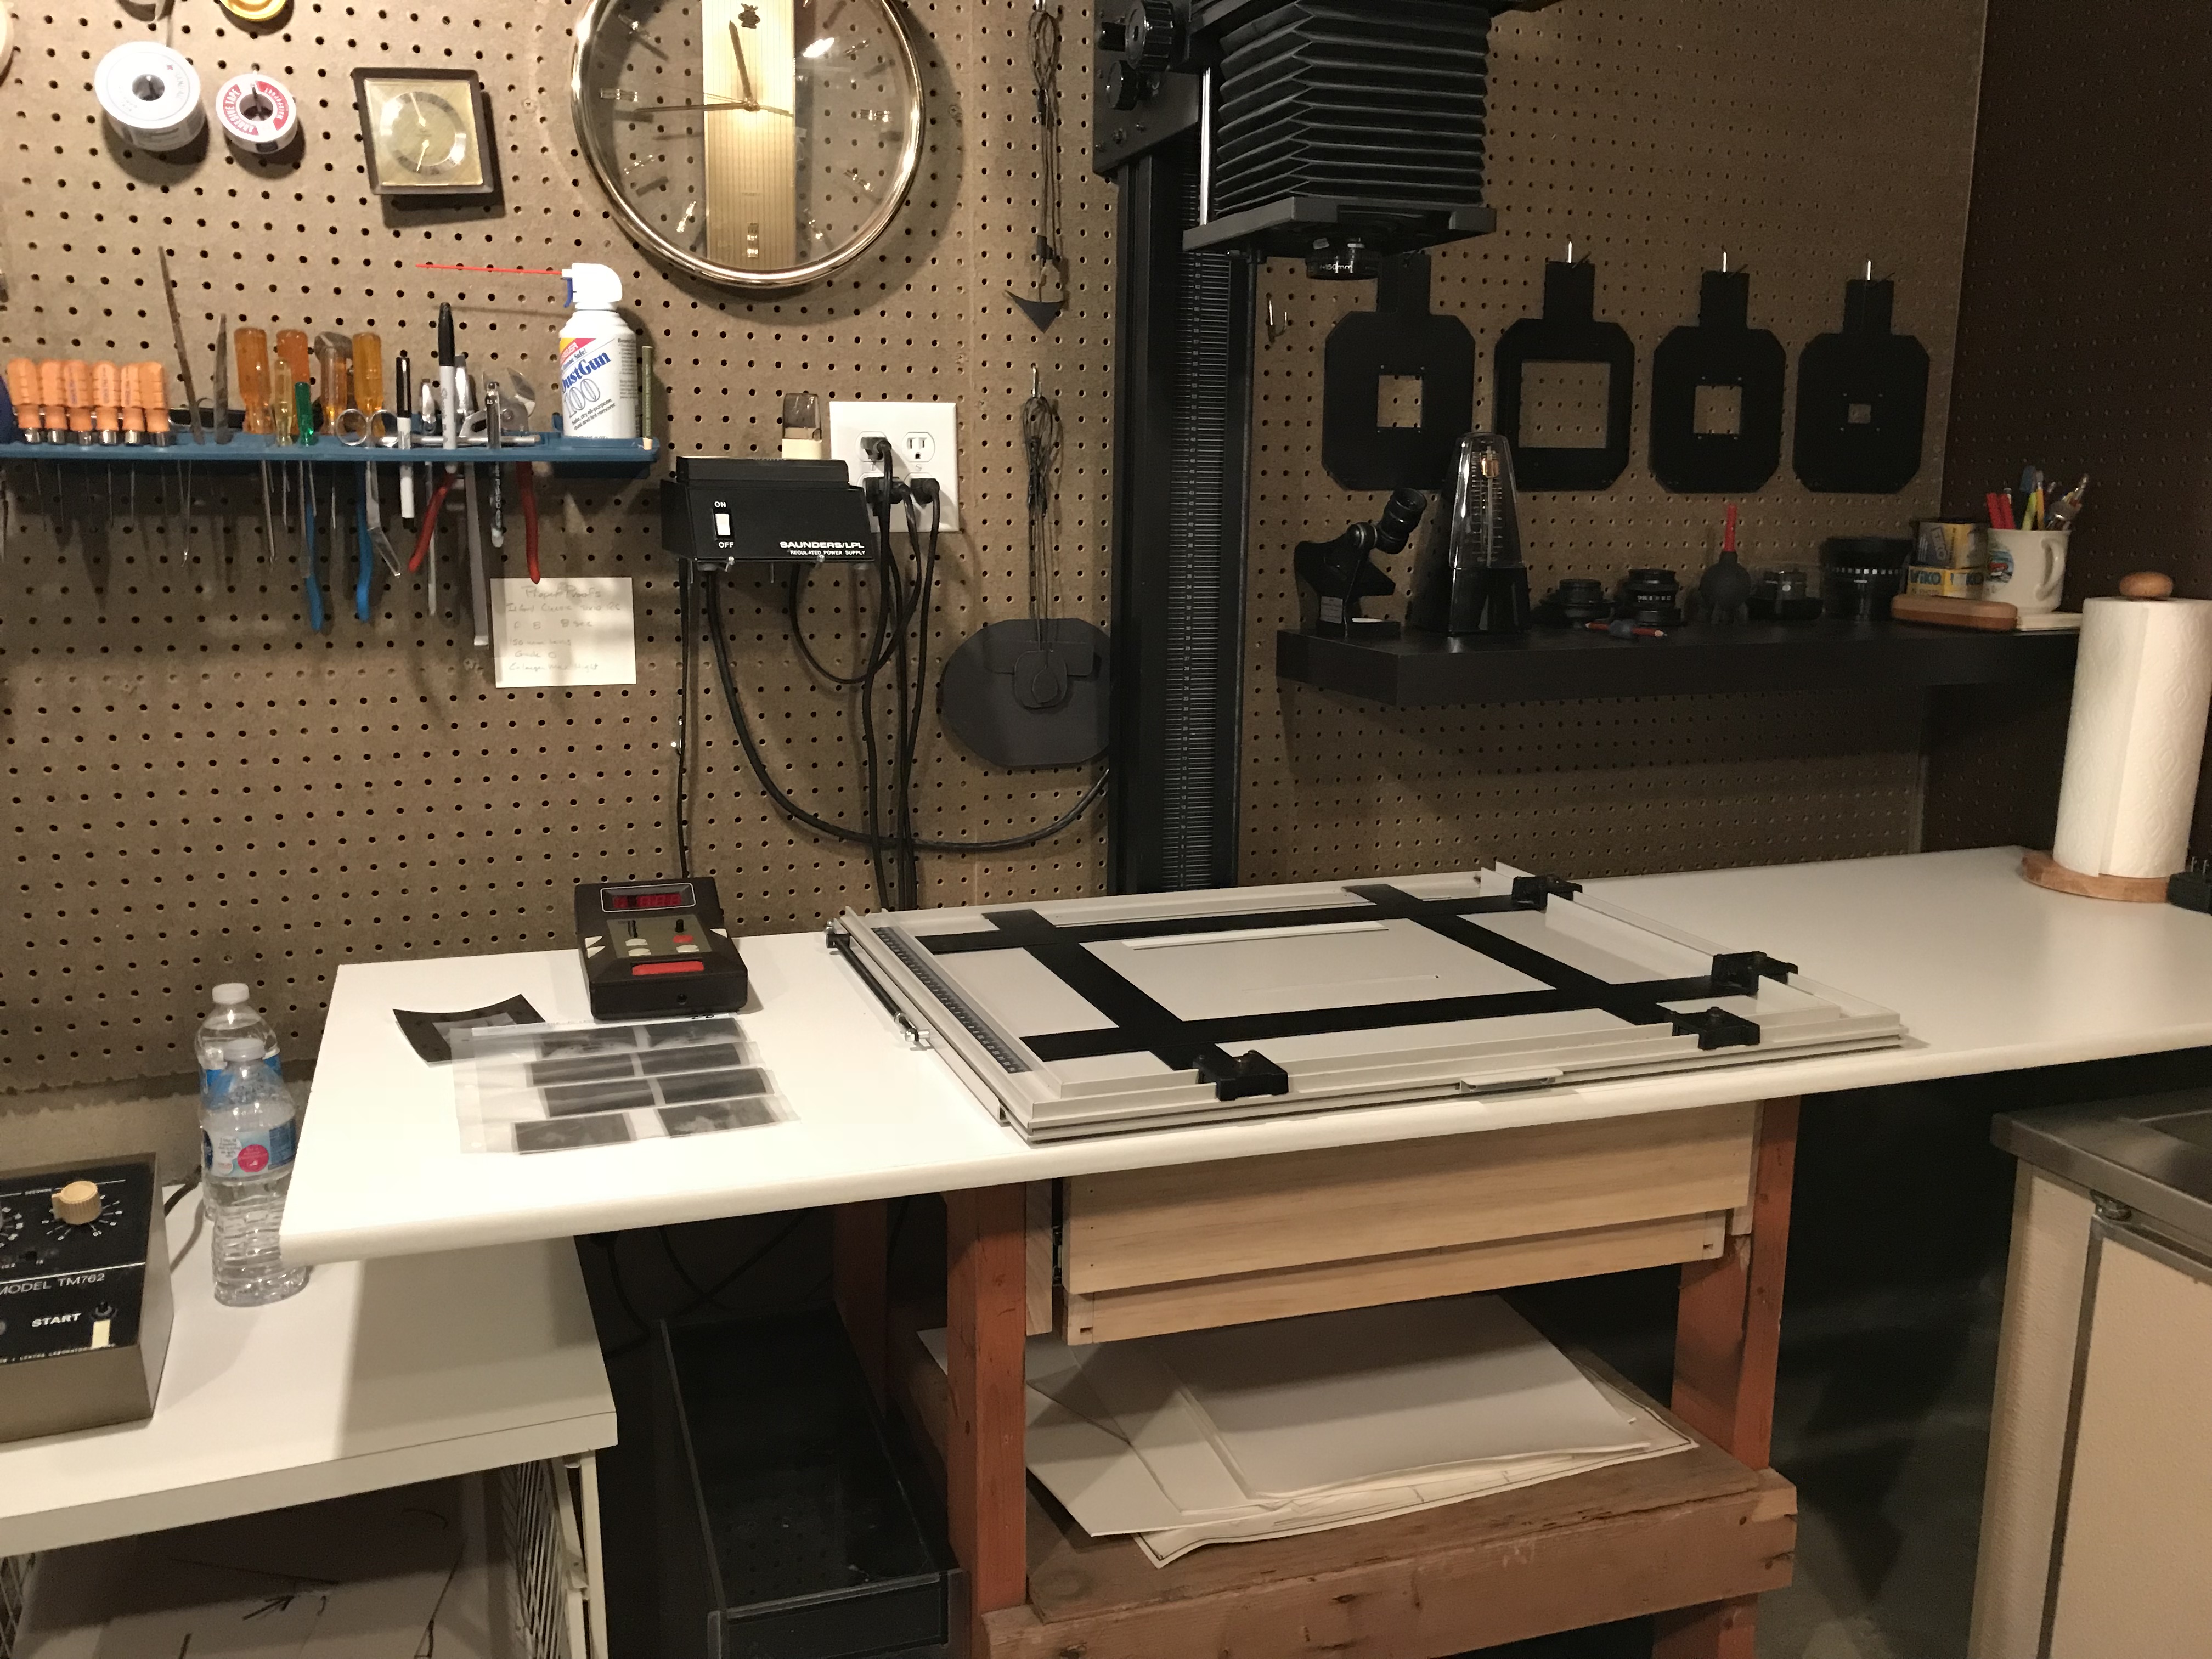
Print inspection
The most important area of my darkroom is my wet print inspection area
(see below). Prints have a tendency to appear a bit darker when dry than
when wet. To account for this, I need to be able to evaluate a wet print
with confidence. To put it another way, I need to know how it will look
when dry.
My inspection area is essentially is a 28×30″ sheet of white Plexiglas
on an easel I built, which sits in my film sink. The light for the area
is a simple 25-watt bare bulb above the easel (you can just about make
out the pull-cord for the light at the top center of the picture below).
It took a bit of trial and error to find the correct wattage
bulb for my new arrangement. I settled on 25-watts by following this process:
I start off by making the best print I can of
a known negative with bright highlights and dark shadows (I usually use my Stairway in the Lighthouse photo) and
follow my process for creating that print completely – including
selenium toning – using the wattage bulb I
think is
correct.
After the print dries, I compare it to my favorite print of that
negative in an area that is lighted similar to gallery lighting. If the
two prints match, the inspection light wattage is correct. If the test
print is too dark, I reduce the wattage of the inspection light. If the
print is too light I increase the wattage of the inspection light. I
then repeat the test.
Fortunately, once I have determined the correct wattage, testing is over
until I change the configuration!
In my experience, changing bulbs – as long as the wattage is the same –
provides consistent results. I prefer a bare frosted bulb with no shade.
In the current darkroom configuration, the inspection light is switched
on and off with a pull string, that has a bit of glow in the dark tape
on the end.
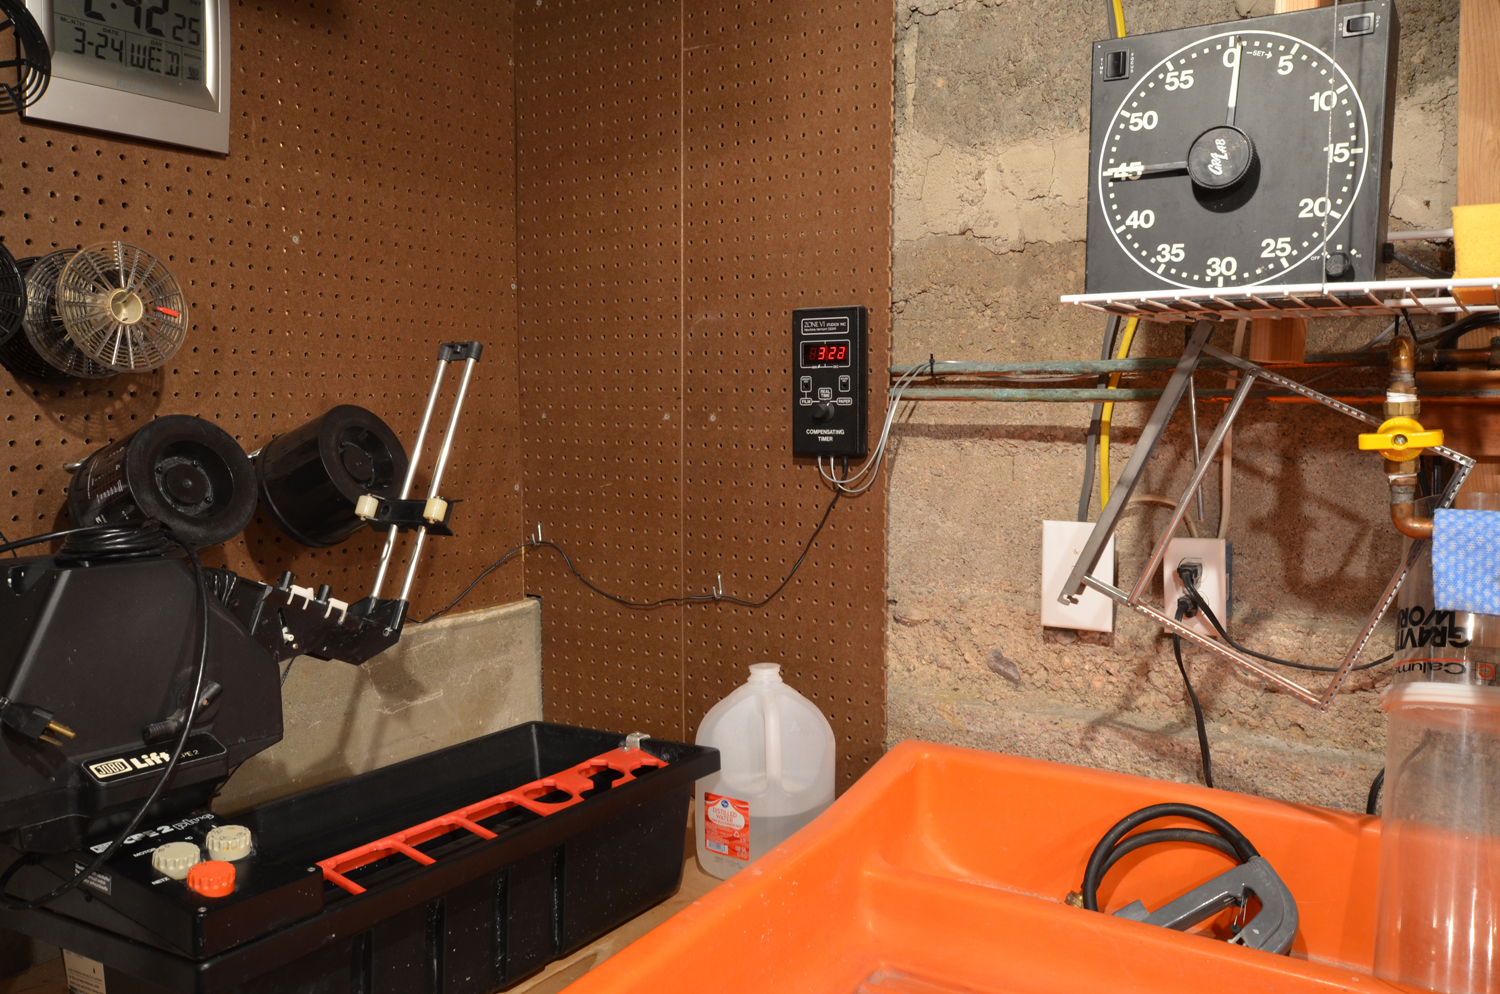
For print development, I use a Zone VI compensating timer. It is a
digital timer that beeps every 30 seconds and can adjust the rate for
temperature variations of the developer.

Jobo CPE 2 Processor, tanks and reels
Several factors should be considered when designing your darkroom:
What can you afford? If you want, a darkroom can be a very expensive undertaking. Everything new, everything top of the line, everything the best brand name. Especially these days, there are some terrific bargains for darkroom equipment, if one is a careful shopper. I recently heard to a school that was converting their darkroom into a computer lab and had 6 enlargers and all of the trays, timers, negative carriers, lenses, developing tanks, etc... free to anyone who would take it away.
What skills do you have? Building your own sink is less expensive than buying a sink by far, and you can build exactly the size that fits your space, but if you build a sink that always leaks, or doesn't drain, it is worse than having no sink at all. Be realistic about your skills. Maybe you can find a used sink that works in your space- but you need to build a stand to support the sink, do you have the skills for that? Or will you need to hire a contractor or a handyman to do these things for you?
What space is available? Most people have a very small darkroom, at least to start. It is tempting to build a large darkroom, but unless you intend to teach large classes, I would encourage you to not oversize the darkroom. Large spaces lead to too many steps. It should only be a couple of steps from the enlarger to the developer tray. The closer the wash tray is to the fixer tray, the better it is. Often the size is decided by what is available, and too small is difficult, but too large is annoying.
Wet or Dry darkroom? It is not very often that a space with hot and cold water and a drain is blocked off and waiting for you to construct your darkroom. Sometimes it is as easy as finding a space close to an existing bathroom or kitchen and having a plumber tie into the existing plumbing. Other times, it requires a massive project to break out concrete and run new plumbing from the main lines. I had one friend that had hot and cold water available, but no drain, so he drained the sink into a 30 gallon garbage can and used a small pump with tubing that went over the wall into the existing shower to drain the garbage can at the end of each printing session. Edward Weston's darkroom had a faucet from the outside water that penetrated the wall above the sink for a water supply. No hot water - just the same water used to water the lawn. I had several dry darkrooms - it is not as convenient, but it is certainly possible to make great prints in a dry darkroom.
What size negatives will you be working with? Larger negatives require larger enlargers, and larger developing drums or tanks. Bigger film takes more space and more chemistry. Build your darkroom to fit the largest format your expect to use. Don't limit yourself, if you really think you will be using larger formats, build for that, but be realistic. If the large format work is not in your plans for several years, do not build for it now.
What is the largest print you expect to make? I don't mean you should build for the largest print you will ever make, what is the largest print you expect to make regularly. I built my current darkroom to print 16x20 prints. I occasionally make 20x24 prints, but not very often. Printing 20x24 is not convenient, but I can do it, while 16x20 is as easy as 8x10 in my darkroom. I have printed up to 30x40 using rain gutter instead of trays, and rolling the prints in the gutter rather that lying prints flat in a tray. There are ways to print large when you need to, but if you are not making large prints, your darkroom can be a bit smaller and your cost is much less.
Is color an option? Will you be developing color film or making color prints? If color is something that is interesting to you, make allowance of that early. Remember that temperature is more important with color, not only for your water supply, but also room temperature. Is there a heat register in the room, or is it an unheated space that will require a heater of some sort? Will you need to add an independent water heater?
Is there a proper electric source? Enlargers, timers, safelights, heaters, film processors, etc.. all require electricity. Stringing an extension cord from the next room is not the best power source. look ahead and find how you are going to power all of the equipment, and do not hesitate to hire an electrician to make sure your darkroom is safe from the very first day.
Ergonomics. I seldom have short sessions in the darkroom. Even developing just a roll of film is about an hour. A prints session usually lasts several hours. Make it comfortable. Be sure there is adequate ventilation. Be sure the lighting is good - not only room lighting, but also the safelights. I use a Thomas Super Safelight, and I really appreciate the additional lighting from it. Be sure the sink is at a comfortable height. I prefer 38 to 40 inches tall. I have found that bending over for hours at a time makes my lower back hurt. I like to listen to music while I am working in the darkroom, and I find podcasts or talk radio distracting. Make sure the radio or other device is dark - or covered so that it can not cause fogging.
Most Important Of All
Remember to have fun and do not put pressure on yourself. Unless you are developing film from a wedding, making photographs is for enjoyment. You will make mistakes, learn, laugh and move on.
Experiment! Some of the most fun images I have made are the result of trying something new. Try techniques that you see other folks trying, but don't give up on what you like. There are many ways to make photographs. Find yours
Listen to what others say, but remember that if you did not hear it directly from Edward Weston or Ansel Adams, it is not gospel. What works for others may not work for you. Or their suggestions may be a starting place for you. Photography is a very personal thing, and it is for you to decide what your want to do and what your like.
Remember - there are a couple of hard and fast rules in photography that no one can change -
1 - Developer is always before fixer. Always.
2 - f/8 is always twice as much light as f/11. Always.
Other than that, you make your rules.